오늘은 지난 시간 Multi Head Attention의 pytorch 구현체를 까본 것에 이어 transformer를 분해해 보겠다. pytorch의 torch.nn.modules.transformer를 기준으로 한다.
참고 : https://pytorch.org/docs/stable/_modules/torch/nn/modules/transformer.html#Transformer
torch.nn.modules.transformer — PyTorch 2.0 documentation
Shortcuts
pytorch.org
1. class Transformer
nn.modules.transformer에서 import 하는 라이브러리들은 다음과 같다.
import copy
from typing import Optional, Any, Union, Callable

import torch
from torch import Tensor
from .. import functional as F
from .module import Module
from .activation import MultiheadAttention
from .container import ModuleList
from ..init import xavier_uniform_
from .dropout import Dropout
from .linear import Linear
from .normalization import LayerNorm
여기서 .activation.MultiheadAttention에 해당하는 코드는 지난 글에 다뤘기 때문에 넘어간다. 해당 클래스의 forward에서는 qurey, key, value를 필수 인자로 받았었다.
Multi Head Attention 구현체 설명 : https://hi-lu.tistory.com/entry/torch-%ED%8C%8C%EC%9D%B4%ED%86%A0%EC%B9%98%EB%A1%9C-%EB%B3%B4%EB%8A%94-transformer-MultiheadAttention%EA%B3%BC-numpy%EB%A1%9C-%EA%B5%AC%ED%98%84%ED%95%98%EA%B8%B0
[torch] 파이토치로 보는 transformer MultiheadAttention과 numpy로 구현하기
transformer(트랜스포머)가 사용되는 모델의 대표작은 작년 말에 나온 ChatGPT가 있다. 자연어 생성 모델의 대표작인 ChatGPT가 있다면 이미지 모델에선 Vision Tansformer(ViT)가 다양한 모델의 백본(backbone)
hi-lu.tistory.com
Transformer 클래스의 __init__함수를 보면 다음과 같이 Encoder와 Decoder를 정의해주고 있는 것을 확인할 수 있다. TransformerEncoderLayer 선언 후 TransformerEncoder로 감싸서 self.encoder를 선언했다. 마찬가지로 self.decoder 또한 TransformerDecoderLayer 생성 후 TransformerDecoder에 넣어서 선언하고 있다. 이 코드에서 또 하나 확인할 수 있는 것은 encoder, decoder가 각각 LayerNorm을 사용하고 있단 것이다.
class Transformer(Module):
    def __init__(self, d_model: int = 512, nhead: int = 8, num_encoder_layers: int = 6,
                 num_decoder_layers: int = 6, dim_feedforward: int = 2048, dropout: float = 0.1,
                 activation: Union[str, Callable[[Tensor], Tensor]] = F.relu,
                 custom_encoder: Optional[Any] = None, custom_decoder: Optional[Any] = None,
                 layer_norm_eps: float = 1e-5, batch_first: bool = False, norm_first: bool = False,
                 device=None, dtype=None) -> None:
        factory_kwargs = {'device': device, 'dtype': dtype}
        super().__init__()
        torch._C._log_api_usage_once(f"torch.nn.modules.{self.__class__.__name__}")

        if custom_encoder is not None:
            self.encoder = custom_encoder
        else:
            encoder_layer = TransformerEncoderLayer(d_model, nhead, dim_feedforward, dropout,
                                                    activation, layer_norm_eps, batch_first, norm_first,
                                                    **factory_kwargs)
            encoder_norm = LayerNorm(d_model, eps=layer_norm_eps, **factory_kwargs)
            self.encoder = TransformerEncoder(encoder_layer, num_encoder_layers, encoder_norm)

        if custom_decoder is not None:
            self.decoder = custom_decoder
        else:
            decoder_layer = TransformerDecoderLayer(d_model, nhead, dim_feedforward, dropout,
                                                    activation, layer_norm_eps, batch_first, norm_first,
                                                    **factory_kwargs)
            decoder_norm = LayerNorm(d_model, eps=layer_norm_eps, **factory_kwargs)
            self.decoder = TransformerDecoder(decoder_layer, num_decoder_layers, decoder_norm)
이후 forward함수에서는 self.encoder와 self.decoder를 차례로 불러오는 간단한 코드로 구성되어 있다. encoder의 결과값은 memory로 변수명을 지었는데, 이 이름을 통해 transformer가 encoder로 무엇을 하고 싶어 하는 건지 다시 상기할 수 있겠다. self.encoder에서는 src(input)과 mask를 통해 memory를 리턴하고, self.decoder에서는 tgt(타겟)과 memory를 넣어 최종 결괏값을 도출한다.
def forward(self, src: Tensor, tgt: Tensor, src_mask: Optional[Tensor] = None, tgt_mask: Optional[Tensor] = None,
                memory_mask: Optional[Tensor] = None, src_key_padding_mask: Optional[Tensor] = None,
                tgt_key_padding_mask: Optional[Tensor] = None, memory_key_padding_mask: Optional[Tensor] = None) -> Tensor:

        memory = self.encoder(src, mask=src_mask, src_key_padding_mask=src_key_padding_mask)
        output = self.decoder(tgt, memory, tgt_mask=tgt_mask, memory_mask=memory_mask,
                              tgt_key_padding_mask=tgt_key_padding_mask,
                              memory_key_padding_mask=memory_key_padding_mask)
        return output
Tansformer class에서는 encoder와 decoder를 선언하고 층을 쌓은 것 외에는 하는 일이 없단걸 알았다. 이제 TransformerEncoder와 TransformerDecoder가 어떻게 구현되어 있는지 살펴보자.
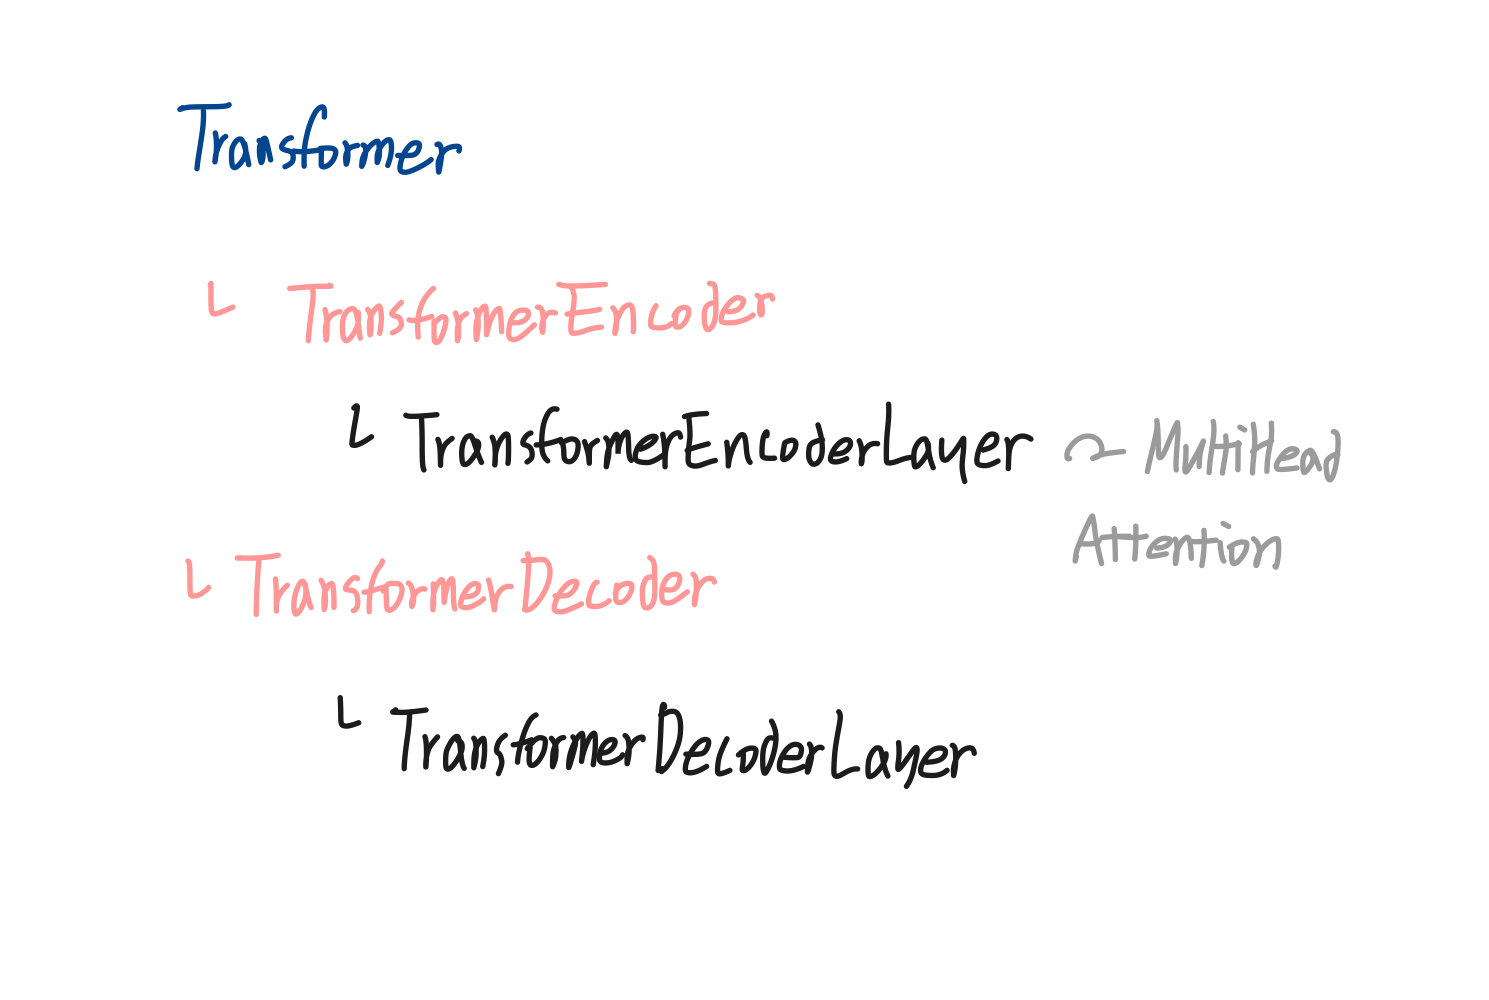
2. TransformerEncoder, TransformerDecoder
TransformerEncoder은 encoder_layer를 N개 쌓은 층을 나타내며, 자연어 모델 중 하나인 BERT를 구현하는 데에 사용되는 모듈이다. __init__함수를 보면 encoder 레이어와 레이어 수를 필수 인자로 받고 있다.
class TransformerEncoder(Module):
    def __init__(self, encoder_layer, num_layers, norm=None, enable_nested_tensor=True, mask_check=True):
        super().__init__()
        torch._C._log_api_usage_once(f"torch.nn.modules.{self.__class__.__name__}")
        self.layers = _get_clones(encoder_layer, num_layers)
        self.num_layers = num_layers
        self.norm = norm
        self.enable_nested_tensor = enable_nested_tensor
        self.mask_check = mask_check
이 클래스의 forward를 살펴보면 크게 mask를 생성하는 부분과 encoderlayer를 n번 통과시키는 부분으로 나눌 수 있다. 여기서 F._canonical_mask에 대해서는 지난 MultiHeadAttention에서 다뤘기 때문에 생략한다.
def forward(
            self,
            src: Tensor,
            mask: Optional[Tensor] = None,
            src_key_padding_mask: Optional[Tensor] = None,
            is_causal: Optional[bool] = None) -> Tensor:
      #### mask를 선언하는 부분. padding mask와 mask를 선언하고 있음을 알 수 있다.
        src_key_padding_mask = F._canonical_mask(
            mask=src_key_padding_mask,
            mask_name="src_key_padding_mask",
            other_type=F._none_or_dtype(mask),
            other_name="mask",
            target_type=src.dtype
        )

        mask = F._canonical_mask(
            mask=mask,
            mask_name="mask",
            other_type=None,
            other_name="",
            target_type=src.dtype,
            check_other=False,
        )
이어서 forward 함수를 보면 encoderlayer를 순차적으로 호출하는 코드가 나온다.
for mod in self.layers:
            output = mod(output, src_mask=mask, is_causal=is_causal, src_key_padding_mask=src_key_padding_mask_for_layers)
TransformerDecoder도 마찬가지다. 단 decoder에서 mask는 optional로 들어가기 때문에 decoder leyer를 순차적으로 통과하는 코드가 있다. TransformerEncoder, TransformerDecoder 클래스의 코드가 이렇게 조촐하니 진짜 파티는 TransformerEncoderLayer, TransformerDecoderLayer에서 있겠다.
3. TransformerEncoderLayer
드디어 Encoder Layer를 살펴볼 차례다. __init__에서 층의 개수를 중점적으로 살펴본다면 MultiHeadAttention, Linear 레이어 2개가정의되었음을 알 수 있다. self.norm_first는 normalization 층을 전에 넣을 건지 후에 넣을 건지를 판단하기 위한 boolean(True, False) 값이다.
class TransformerEncoderLayer(Module):
    __constants__ = ['batch_first', 'norm_first']

    def __init__(self, d_model: int, nhead: int, dim_feedforward: int = 2048, dropout: float = 0.1,
                 activation: Union[str, Callable[[Tensor], Tensor]] = F.relu,
                 layer_norm_eps: float = 1e-5, batch_first: bool = False, norm_first: bool = False,
                 device=None, dtype=None) -> None:
        factory_kwargs = {'device': device, 'dtype': dtype}
        super().__init__()
        self.self_attn = MultiheadAttention(d_model, nhead, dropout=dropout, batch_first=batch_first,
                                            **factory_kwargs)
        # Implementation of Feedforward model
        self.linear1 = Linear(d_model, dim_feedforward, **factory_kwargs)
        self.dropout = Dropout(dropout)
        self.linear2 = Linear(dim_feedforward, d_model, **factory_kwargs)

        self.norm_first = norm_first
        self.norm1 = LayerNorm(d_model, eps=layer_norm_eps, **factory_kwargs)
        self.norm2 = LayerNorm(d_model, eps=layer_norm_eps, **factory_kwargs)
        self.dropout1 = Dropout(dropout)
        self.dropout2 = Dropout(dropout)
내부 함수로 두 가지 _sa_block과 _ff_block을 정의하고 있다. _sa_block은 self-attention용 블럭으로, init에서 정의했던 attention layer와 dropout을 하나로 묶은 함수다. 여기서 self_attn에 input 인자로 query, key, value 위치에 x, x, x를 넣은 것으로 self attention을 수행하고 있음을 알 수 있다. _ff_block은 위에서 정의한 2개 lienar layer들을 dropout들과 묶은 함수다.
참고. attention 수행 후 [0]이 붙는 이유가 있다. pytorch의 multi head attention은 attention 결과와 attention weight 2개를 return 하기 때문이다.
    # self-attention block
    def _sa_block(self, x: Tensor,
                  attn_mask: Optional[Tensor], key_padding_mask: Optional[Tensor], is_causal: bool = False) -> Tensor:
        x = self.self_attn(x, x, x,
                           attn_mask=attn_mask,
                           key_padding_mask=key_padding_mask,
                           need_weights=False, is_causal=is_causal)[0]
        return self.dropout1(x)

    # feed forward block
    def _ff_block(self, x: Tensor) -> Tensor:
        x = self.linear2(self.dropout(self.activation(self.linear1(x))))
        return self.dropout2(x)
이제 forward를 보자. mask를 정의하는 부분은 생략하고, 레이어들이 어떻게 흐르는지를 중점으로 살펴보자. 정말 놀랍게도 아래처럼 코드가 줄어든다. self.norm_first가 True일 경우는 _sa_block, ff_block 함수를 호출하기 전 x에 미리 layernorm을 해준다. 흐름을 보면 다음과 같은 순서로 층이 쌓였다.
- x를 self attention 한다.
- 위 결과에 x를 더한다.
- 위 결과를 linear layer 2개에 통과시킨다.
- 위 결과에 x를 더한다.
def forward(
            self,
            src: Tensor,
            src_mask: Optional[Tensor] = None,
            src_key_padding_mask: Optional[Tensor] = None,
            is_causal: bool = False) -> Tensor:

        x = src
        if self.norm_first:
            x = x + self._sa_block(self.norm1(x), src_mask, src_key_padding_mask, is_causal=is_causal)
            x = x + self._ff_block(self.norm2(x))
        else:
            x = self.norm1(x + self._sa_block(x, src_mask, src_key_padding_mask, is_causal=is_causal))
            x = self.norm2(x + self._ff_block(x))

        return x
Transformer 논문인 Attention is All you Need 의 figure를 보면 일치함을 알 수 있다. figure의 Add가(ResNet에서의 residual 마냥) 코드에서 + 연산으로 들어가고 있다. 여기서 하나 더 알 수 있는 점은, 이 TransformerEncoderLayer에 들어오는 input은 figure의 inputs이 아닌 positional encoding 한 후의 input일 거란 거다. 큰 범위에서부터 아래로 transformer 코드를 까면서 우리는 input을 positional화 한 코드를 보지 못했다.

4.TransformerDecoderLayer
마지막이다. TransformerDecoderLayer에서 층들이 어떻게 선언되어 있는지를 __init__을 통해 먼저 살펴보자. feedforward를 위한 linear 층이 2개, multihead attention 층이 2개가 있다. MultiHead Attention중 하나는 self.self_attn 즉 self attention용 레이어로, 나머지 하나는 self.multihead_attn으로 선언되어 있음을 확인했다.
class TransformerDecoderLayer(Module):
    __constants__ = ['batch_first', 'norm_first']

    def __init__(self, d_model: int, nhead: int, dim_feedforward: int = 2048, dropout: float = 0.1,
                 activation: Union[str, Callable[[Tensor], Tensor]] = F.relu,
                 layer_norm_eps: float = 1e-5, batch_first: bool = False, norm_first: bool = False,
                 device=None, dtype=None) -> None:
        factory_kwargs = {'device': device, 'dtype': dtype}
        super().__init__()
        self.self_attn = MultiheadAttention(d_model, nhead, dropout=dropout, batch_first=batch_first,
                                            **factory_kwargs)
        self.multihead_attn = MultiheadAttention(d_model, nhead, dropout=dropout, batch_first=batch_first,
                                                 **factory_kwargs)
        # Implementation of Feedforward model
        self.linear1 = Linear(d_model, dim_feedforward, **factory_kwargs)
        self.dropout = Dropout(dropout)
        self.linear2 = Linear(dim_feedforward, d_model, **factory_kwargs)

        self.norm_first = norm_first
        self.norm1 = LayerNorm(d_model, eps=layer_norm_eps, **factory_kwargs)
        self.norm2 = LayerNorm(d_model, eps=layer_norm_eps, **factory_kwargs)
        self.norm3 = LayerNorm(d_model, eps=layer_norm_eps, **factory_kwargs)
        self.dropout1 = Dropout(dropout)
        self.dropout2 = Dropout(dropout)
        self.dropout3 = Dropout(dropout)
TransformerEncoderLayer와 같이 내부 함수또한 존재한다. _sa_block에서는 query key value가 전부 x인 self attention을 수행하고 dropout을 적용했다. _mha_block은 encoder의 결괏값이었던 memory를 key와 value로, x를 query로 갖는 multi head attention을 진행한다. _ff_block은 Encoder Layer와 동일하게 feed forward를 수행하는 2개의 linear layer를 묶었다.
참고. attention 수행 후 [0]이 붙는 이유가 있다. pytorch의 multi head attention은 attention 결과와 attention weight 2개를 return 하기 때문이다.
    # self-attention block
    def _sa_block(self, x: Tensor,
                  attn_mask: Optional[Tensor], key_padding_mask: Optional[Tensor], is_causal: bool = False) -> Tensor:
        x = self.self_attn(x, x, x,
                           attn_mask=attn_mask,
                           key_padding_mask=key_padding_mask,
                           is_causal=is_causal,
                           need_weights=False)[0]
        return self.dropout1(x)

    # multihead attention block
    def _mha_block(self, x: Tensor, mem: Tensor,
                   attn_mask: Optional[Tensor], key_padding_mask: Optional[Tensor], is_causal: bool = False) -> Tensor:
        x = self.multihead_attn(x, mem, mem,
                                attn_mask=attn_mask,
                                key_padding_mask=key_padding_mask,
                                is_causal=is_causal,
                                need_weights=False)[0]
        return self.dropout2(x)

    # feed forward block
    def _ff_block(self, x: Tensor) -> Tensor:
        x = self.linear2(self.dropout(self.activation(self.linear1(x))))
        return self.dropout3(x)
forward 함수와 Attention is All You Need에서 정의한 Decoder figure를 함께 비교하며 살펴보자.
 def forward(
        self,
        tgt: Tensor,
        memory: Tensor,
        tgt_mask: Optional[Tensor] = None,
        memory_mask: Optional[Tensor] = None,
        tgt_key_padding_mask: Optional[Tensor] = None,
        memory_key_padding_mask: Optional[Tensor] = None,
        tgt_is_causal: bool = False,
        memory_is_causal: bool = False,
    ) -> Tensor:


        x = tgt
        if self.norm_first:
            x = x + self._sa_block(self.norm1(x), tgt_mask, tgt_key_padding_mask, tgt_is_causal)
            x = x + self._mha_block(self.norm2(x), memory, memory_mask, memory_key_padding_mask, memory_is_causal)
            x = x + self._ff_block(self.norm3(x))
        else:
            x = self.norm1(x + self._sa_block(x, tgt_mask, tgt_key_padding_mask, tgt_is_causal))
            x = self.norm2(x + self._mha_block(x, memory, memory_mask, memory_key_padding_mask, memory_is_causal))
            x = self.norm3(x + self._ff_block(x))

return x- x에 self attention을 수행하고 x를 더한다.
- 위 결과로 multi head attention을 수행하고 위 결과를 더한다.
- 위 결과를 feed forward한 후 위 결과를 더한다.

이로써 이제 pytorch의 transformer 구현체를 정복했다!
'머신러닝 > 덜 어려운 머신러닝' 카테고리의 다른 글
| Gaussian, Bernoulli로 이해하는 머신러닝 (0) | 2024.08.24 |
|---|---|
| 왕초보용 langchain 코드 튜토리얼 (w. RAG) (0) | 2024.08.11 |
| LLM 학습 개요 - pretrain vs finetuning (0) | 2024.05.31 |
| 구현체를 통해 PEFT lora 를 알아보자 (0) | 2024.03.17 |
| sklearn SVM(Support Vector Machine) 가이드 (0) | 2023.07.23 |